Pages

Monday, 26 August 2013

A Birthday Idea: For A Friend

Hello everybody, I have had quite a busy weekend and therefore my post hasn't been up earlier.

This is a gift a made recently for a friend's birthday, it's very simple, it looks nice and I think she liked it.
I made a personalized spray painted jar, this is what it turns out like so if you like the look of it carry on reading about how I did it and how simply you can do it too.


Before I go any further I just want to point out that I don't have a picture of the final product but at the end I will explain what and how I did it. Okay, let's go.


1. Equipment: All I used was a small jar, a glue gun, matte purple spray paint, face mask, rubber gloves (all below). Also a binbag to prevent the spray paint from going al over the table or floor or wherever you decide to work.


2. Next, I used my glue gun to write 'Emma' on the jar. Leave that to dry and choose a colour spray paint. I would recommend matte finish paint as I prefer how that looks in the end but it does also work with shiny finish paint so don't worry if that's all you have or that's what you've chosen.


3. Turn your jar upside down and spray it, ensuring you cover all the gaps. You may find that when it dries and you turn it back the right way around the top of the letters may not have got any colour on them, in which case you can just spray over them again while your jar is standing the correct way up.


4. This is the spray paint I used, in the second picture you can see how the matte purple finish looks, when you are choosing your paint, check this part of the can so you have an idea about what it will dry like.


5. Your finished product should look something like this. When I prepared it as the gift I lined it with tissue paper and filled it with pick and mix sweets, I didn't use the jar lid that came with it, instead I used a muffin case, placed upside down on the top and tied a piece of ribbon around the neck of the jar. I also suggested that she could use the jar as a pen pot or for another use, maybe you have a different idea than filling it with sweets which they may appreciate more, in which case go for it, haha.


Okay, that's all for today it nearing half 10 and I've had little sleep with this busy weekend, might write more about my weekend tomorrow because I had some pretty exciting things happen that will forever make me smile - it makes me so happy.
Anyway, I'm getting side tracked, goodbye, goodnight & god bless.


Aoife


Saturday, 17 August 2013

Holiday/Travels: Devon

Hi everyone,

So as you all know, I was recently in Devon on holiday for a week. We went to a haven site and I had a fantastic time. We went to the beach a lot and built a sand castle and I couldn't help but take some scenic pictures of the beach and its surroundings.

Another day, we went on a coastal walk which seemed longer than it was due to the heat (I'm not complaining - the weather was lovely) and the view from the cliffs were unbelievable. Additionally, I enjoyed it up there because it was one of the very few moments I actually had some internet signal on my phone, so I went crazy - YouTube, Twitter, Snapchat - the lot. 

On the Friday, it was Georgia's birthday so she decided to go to the zoo for a day out. We visited Paignton Zoo and it was lovely, however, most of the animals were behind glass or a metal caged fence - not ideal for my pictures. I will share the ones that were successful and look nice but there's nothing else I can do otherwise. 


Firstly, these are some photographs of the beach, specifically the water, the waves look really slow and gentle and I think these look very peaceful. We didn't play in the sand a lot, although we did built a sand castle (below) - I decorated it with mussel shells. The picture you will find last in this part is the view from the beach restaurant with was at the top of the hill up off the beach. It was a fish and seafood restaurant and we went in one day for a drink after we had been on the beach, you can see along the beach from here (this is over to the left hand side). 


Mussel shell decorated sand castle

Beach view from the restaurant


Amazing views from the costal walk on the top of the cliff. We had an unbelievable view across the water, astounding pictures and I didn't realize at the time just how beautiful it was. 


Lastly, the zoo. Paignton Zoo was a beautiful place and I recommend it if you're ever near or down Devon way, I suggest you visit. Anyways, here's some of my favourite pictures from the day.

If I knew what this bird was called I would put it as the caption...

Deceiving picture here, they were fighting, not kissing.  

Huge tortoise, it was as big as it looks.

Mr Elegance.

Alligator, I wasn't as close to it as it looks in this picture.

Slippery, slimey snake.

I was this close to a goat that I had to take a selfie with it.

I wanted to bring this little rabbit home with me to be a friend for Ollie - how cute is he!?

Mummy & her babies.

Orangutan.

A Lemur in a tree.

Flamingo Island. 

There you go, there's some of my holiday in pictures, I hope you have enjoyed this and you liked my pictures, I think I have a few good memories here that I can keep for me to remember this holiday. I think this selection of pictures represents my week well - it's a good range of what I did, except for the night times. We went to the entertainment night club every night and despite it being children's entertainment, it was always full and there was plenty of adults and teenagers there. 
I loved every minute of it and didn't want to come home. I love haven sites and I think I will for as long as I live. You're never to old for haven. That's my slogan.

Okay, that's all I have for now, speak to you all sometime soon.

Aoife


Wednesday, 14 August 2013

A Birthday Idea: For A Friend

A POST AT LAST! You may be thinking "Aoife, where have you been for the past two weekends?" Well, I was kindly invited to go on holiday with Georgia and her family so that is why you have seen no sight of any content for the past two or three weekends, but I'm back and ready to go again after having a break.

Hello everyone, 

I did promise this post a while back but I've had other things to post before it. This is a present idea for a friend or family member. I made these for one of my friends birthday and she really liked them so I am going to share this idea with you.


Chocolate Lollipops
I used:

  • 2  1/2 bars of chocolate
  • 2 packets white chocolate buttons
  • Icing Pens
  • Pan
  • Small Glass Bowl
  • Wooden skewers 
  • Small spatula
  • Teaspoon
  • Baking tray
  • Grease proof paper
Please Note: I was able to make 6 decent sized lollipops as you can see in the pictures.


Usually, chocolate is already in squares in the packet when you buy it, break them all off into small squares and break the small squares in half again. By using smaller squares they melt quicker, however, it takes longer as you have more to melt.


Boil water and put a small amount at the bottom of the pan, if younger children are making these lollipops, please take safety precautions with boiling water and have an adults supervision. Next, put your glass bowl into the water ensuring the water does not go into the bowl, if it does, empty out some water from your pan. It is unnecessary to turn the gas on, however, if the water begins to cool down after a while, you may want to heat it some more.
Gradually add the small chunks of chocolate into the bowl, maybe 4 or 5 pieces at a time. Do not let the chocolate come into contact with any water as this will make the chocolate stiff and cannot be used. 


Cover your baking tray with grease proof paper and you may want to rub a small amount of butter on the grease proof paper to prevent the chocolate from sticking, however, I never found this to be a problem.
After your chocolate has melted, spoon it out onto your grease proof paper and use your spatula to shape it into a circle (or whatever shape you are going for).  


Take one of your wooden skewers, mine were quite long so I found it was better to snap them in half to make shorter sticks. Slide your stick into the bottom of the chocolate and use your spatula to spread the chocolate over and cover the skewer (above).


Once you have completed them steps for however many you are making, take your white chocolate buttons and place them around the edge for decoration.


Eventually, they should look something like this. Now you should put your baking tray/s into the fridge and leave them for a couple of hours for the chocolate to set and go hard.
Once they're ready, take them out of the fridge on the trays and use your icing pens to be as creative as you like, different colours, different patterns, names etc. My friend watches the show Pretty Little Liars so I used my icing pens to write 'Pretty Little Liars' and each of the 4 main characters names.

Unfortunately, I seem to have lost the picture I took of the finished lollipops, if I do find it, I'll update this post but for now you can all just imagine it. I came home this weekend from my holiday with Georgia and her family as I mentioned so I have a few pictures from that to share with you.

I hope you have enjoyed this and are still interested in these gift ideas, I have another friend's birthday coming up and I really don't know what I'm planning on doing, so you can wish me luck with that and I will speak to you all very soon. 

Aoife


Sunday, 28 July 2013

Festival LookBook

Hello everyone, 

So as you are aware if you read my previous post, I had a festival themed party with my friends. Because we had a theme, out outfits were a big part of preparation so we looked like we were dressed for a festival. I thought this was the perfect opportunity to do a Festival LookBook, this is the first one I have ever attempted and this is a bit different from normal lookbooks because I just took pictures of outfits without my friends being on the pictures. Before I start, I just want to thank everyone for agreeing to do this for me so I could write this post.


This is a cute, blue themed festival outfit made up of a skirt pinafore and patterned t-shirt. The t-shirt is black, white & pale blue, the pinafore a light denim paired with yellow nails (not pictured).


This is a lovely simple idea for a festival outfit. Plain, short sleeved, block coloured red top with pale denim-grey shorts.

Paired with simple black and white converse and a pretty daisy anklet with (below) a long, black feather necklace, a range of blue bracelets and pale blue nail varnish. Effortless festival 


Another effortless pretty outift, blue and denim. Simple, thin top with simplistic pattern, teamed with light denim high-waisted shorts.

A few bracelets to accessorize and impressive ombre pink nails. I think this pink shade is complimented well by the slight olive skin tone.


This outfit is a lovely summery aztec print dress. Only being quite light, this dress is a good choice for festival type events or days in the sun. I love the colours in this and I like how the aztec is horizontal on the top and vertical on the lower skirt half.

Very well teamed with a turqouise/dark mint vintage necklace and simple dark pink nails and some simple jewellery.  


I think this is a very summery, girly festival outfit. I like that it is simplistic and seems effortlessly fashionable. A plain white floral lace top with some ripped shorts and a brown belt, and brown/tan shoes.


Topped off with a delicate white flower headband in contrast to dark hair.

I'm sure everyone would agree with me that best dressed has to go to this outfit - nothing says festival more than this. A white shirt and denim skirt with red wellies (below) with jewellery and accessories to make it look even better.


This proves that accessories can make an outfit look a whole lot different. A few rings, two two-finger rings, a small top-of-the-finger ring and a thumb ring. The bracelets bring a lot of colour and I like the range of colourful beaded bracelets on one wrist and some other bracelets tied to the other.

What a trendy way to wear sunglasses and bandana if not on your head. This gave it a unique look and a festival vibe. 

This 'World Peace' mixed necklace with a small coloured globe helped the shirt to stand out and give it a bit of colour and excitement.

To finish it all off, a big, dark leopard print hat which was perfect with dark hair and a dark skin tone.

Another cute festival outfit, simple top and shorts with black hunter wellies.


Again, some added jewellery to add to the look and give it some colour and draw more attention to the top.

Another lovely summer coloured outfit, bright floral shorts paired with a good choice of plain top to prevent a pattern clash and keep the attention draw to the shorts. Very simple but summery.

Navy converse, again, to keep it simple and (below) blue nails to match the colour of the shorts with very little jewellery so the wrists aren't bare. Also (below) a beige, neutral hat with brown band to make the top half of this outfit more lively.


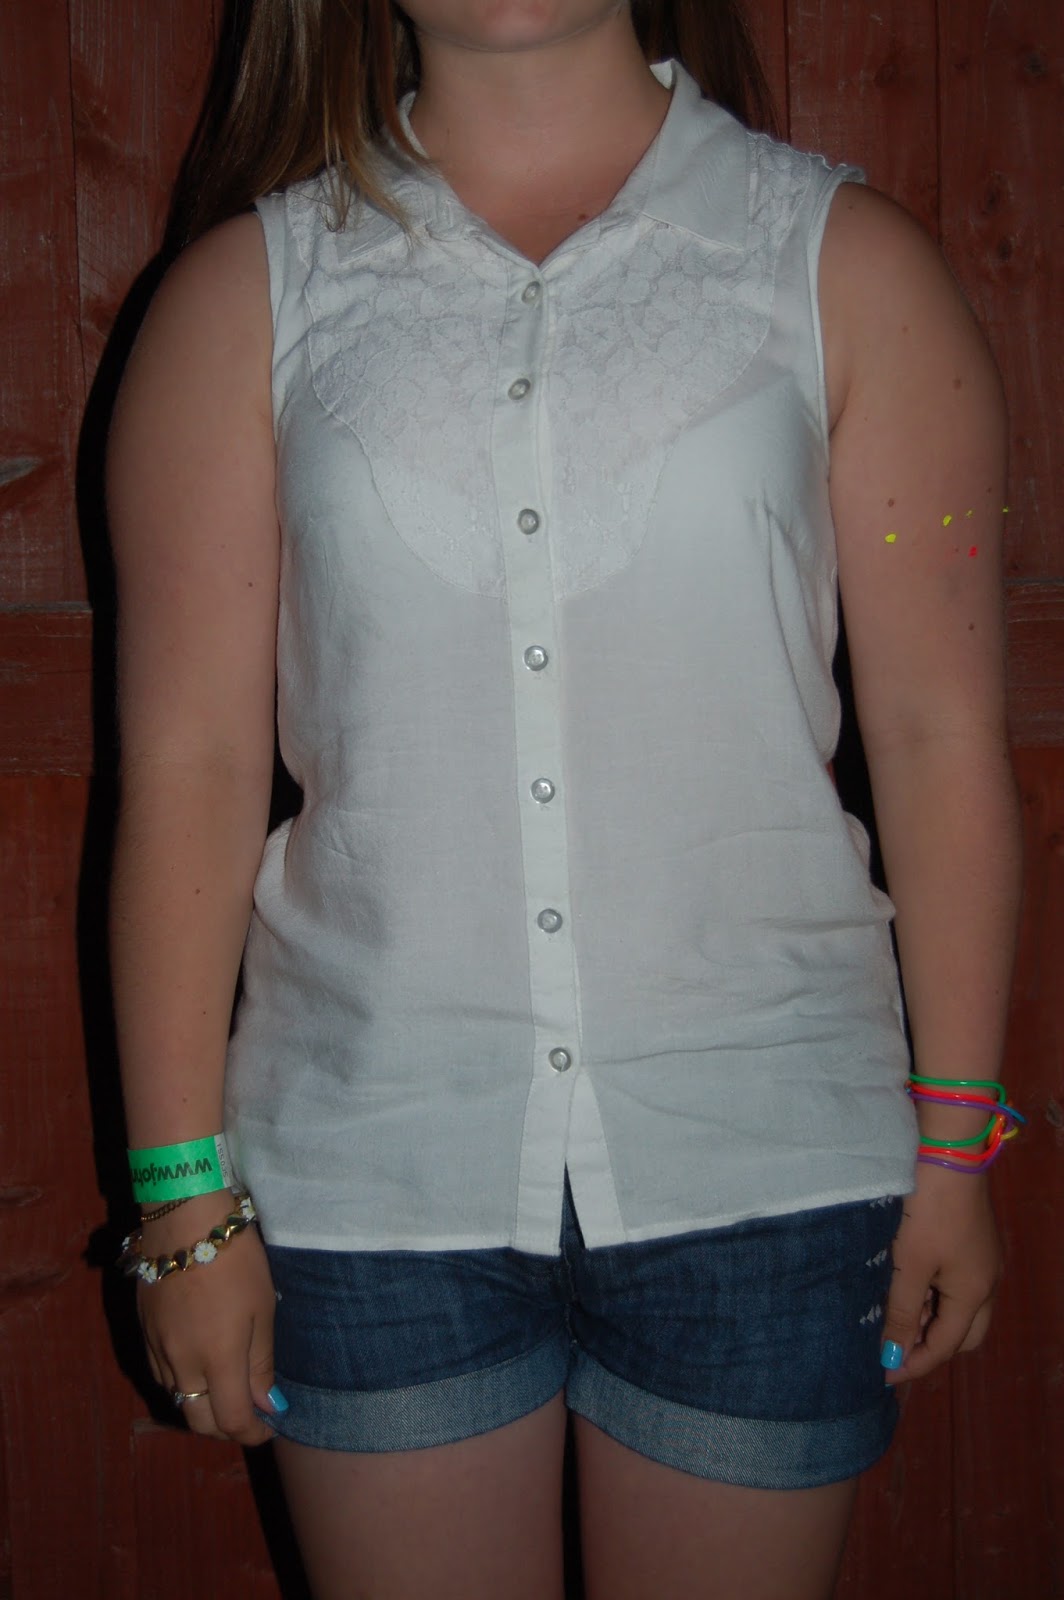
Another cute and plain outfit, white shirt with lace around the collar and dark denim shorts. An outfit like this is good because you are able to go for any colours to brighten it up - whether that be nail varnish colour or jewellery and bracelets.

As you can see, pink converse and blue nail varnish have been chosen with some multi-coloured rubber bracelets and a petite ring with a small diamond. Additionally, the super cute little daisy flower crown has made a difference to the outfit in helping to look more appealing and festival themed.


This final outfit is my own. I have chosen a washed denim jumpsuit, again, with denim you can go for any colour theme to brighten it up. I chose black and white checkered slip-on vans and a black and white striped bow which I made for my hair.


My nails are all blue - Miss Sporty Clubbing Colours 'Pop Fiction' which I have featured in posts before - all except one nail with is grey - MUA 'Koala Bear' topped with clear glitter nail varnish - Rimmel London 'Disco Ball'. This was a nightmare to get off (as glitter nail varnish always is) but I must point out that the 'Koala Bear' shade from MUA goes on really thin, I had to apply about 3-4 coats to get a proper colour but it depends how you like it, you made need more, you may need less.


I do hope you have enjoyed reading it and you deserve some sort of prize for reading this far down, this may have been the longest post I have ever written and it did become tiring but I love writing these posts for you so I will continue, hopefully the content didn't become too boring and you liked looking at the different looks you could go for for a festival or a party.
I'm not sure what is going to come next so I can't give you an idea because I don't know myself but all I know is I will speak to you all soon.

Aoife